Leadlight Stamping Technique Tutorial and How to Make Your Own Lead Light Jelly Nail Polish DIY Video Tutorial! Quick & Easy!
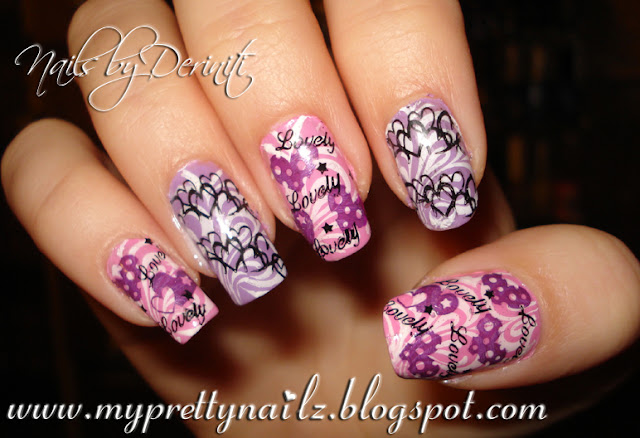
Hey everyone! There's a new technique sweeping the nail stamping world, leadlight stamping! It's probably easier for me to show (check the tutorial below) then to put into words, lol, but let me try anyway: It's basically a technique that uses tinted or jelly nail polish to color in the stamped pattern/image on your nail. For example in the design I did below, I painted a white base, then stamped the flower pattern with black stamping polish & then colored in the flowers with jelly polish. Much quicker than creating decals, which I never tried cause I just don't have the patience, lol...I first heard about it in the facebook group Adventures in Stamping! Messy Mansion as a tutorial for it & their own line of leadlight polishes! You can also do this technique with pretty much any jelly polish or you can create your own! I decided to do a tutorial for this technique because as you know I love doing nail art tutorials and because there aren't many tutorials for this yet. Plus I am going to show you how to do this technique making your own jelly polishes! All you need is some pigmented nail polish and clear polish, mix together so that the color is sheer enough that it won't overpower your dark image border (a good ratio is 75% clear polish to 25% pigmented polish, depending on the opacity of the polish you choose). You can just play around with it until you get it to the proper transparency. I took a black nail art marker & drew some lines on a piece of paper & when I was making my jellies I would just test them by painting them over the black lines. If I could still see the black lines then they were good to go, if the color covered the black then they weren't transparent enough & I would just add some more clear polish. You can also practice over your nails or use practice nails. And if you would like the colors on your nail to be more pigmented, you can always paint on a second coat when they dry. I colored in my flowers using a dotting tool, but you can also use a nail art brush or a toothpick, whatever you are comfortable with. You can even add colors to create shading effects, but I just kept things simple for this tutorial. Also, after you first stamp your nails I suggest applying a top coat BEFORE you apply your leadlight polish. The reason is because if you don't apply a top coat first, you run the risk of your leadlight polish smearing or mixing with your black image border (it happened to me, lol). What do you guys think of this technique? Have you tried it yet?

Please "Like" & Subscribe!
XOXO,
Deriniti


Comments
Visite meu blog Unhas Artísticas Nill:
www.nilvanabischoff.blogspot.com
Canal UAN
Fan Page UAN
Beijinhos.
www.beautylicousreviewsblog.com
Easy Nail Art Designs - Pure Blend